Requirements
There are some requirements that must be met. If you are installing WinRM bridge using setup wizard, these requirements are checked and fixed automatically for you.
Supported Operating Systems (Minimum OS Versions)
- Windows 7 SP1
- Windows 8 or higher
- Windows Server 2008 SP2
- Windows Server 2008 R2 SP1
- Windows Server 2012 or higher
OS Component requirements
- Full .NET Framework 4.5 or higher
- PowerShell 3.0 or higher
Basic installation
Watch this video tutorial and learn how to install a WinRM bridge service in basic configuration, which is generally applicable in the most situations. Installation process doesn’t take longer than one minute as you can find out in this video.
If your computer is not connected to a Windows domain, please read Setting service log on account section below. Also don’t forget to add URL reservation.
Manual configuration of remote machine
Occasionally WinRM remote activation using your mobile device fails and you are forced to perform some necessary steps to make PowerShell Remoting work properly.
When this happens, run these commands on the remote machine as an Administrator:
|
1 2 3 4 5 6 7 8 9 10 11 |
:: initial WinRM configuration winrm quickconfig :: on some systems quickconfig doesn't create default listener, so create it manually for sure winrm create winrm/config/Listener?Address=*+Transport=HTTP :: enable secure CredSSP authentication winrm set winrm/config/service/auth @{CredSSP="true"} :: enable firewall rule (port 5985) netsh advfirewall firewall set rule name="Windows Remote Management (HTTP-In)" new enable=Yes |
On some OS versions (especially on Win2008 SP2), permission must be granted explicitly for the user, group membership seems to be not enough. In this case, open PowerShell as an Administrator and run the following command:
|
1 |
Set-PSSessionConfiguration -Name Microsoft.PowerShell -ShowSecurityDescriptorUI |
Add desired user names to the list with Full Control permissions granted.
PowerShell security
Execution policy
The execution policy you select on device affects only the current PowerShell session. It has no implications for execution policy of managed computer.
- Restricted: Default execution policy, does not run scripts, interactive commands only.
- All Signed: Runs scripts; all scripts and configuration files must be signed by a publisher that you trust; exposes you to the risk of running signed (but malicious) scripts, after confirming that you trust the publisher.
- Remote Signed: Local scripts run without signature. Any downloaded scripts need a digital signature, even an UNC path.
- Unrestricted: Runs scripts; all scripts and configuration files downloaded from communication applications such as Microsoft Outlook, Internet Explorer, Outlook Express and Windows Messenger run after confirming that you understand the file originated from the Internet; no digital signature is required; exposes you to the risk of running unsigned, malicious scripts downloaded from these applications
- Bypass: Nothing is blocked (not recommended)
CredSSP
Credential Security Support Provider enables authentication on a client or on a server computer. The user’s credentials are passed to a remote computer to be authenticated. This type of authentication is designed for commands that create a remote session from within another remote session. For example, you use this type of authentication if you want to run a background job on a remote computer.
Installation from pre-configured package
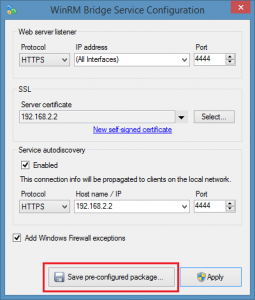
WinRM Bridge Service Configuration Utility allows you to save a pre-configured package. This is useful for example in a situation when you want to deploy WinRM bridge service on some Server Core Windows machine. You can configure bindings and certificate locally, save pre-configured package, then copy this package to a target computer.

If you select SSL certificate in the configuration utility, the package also contains all necessary certificates to configure SSL bindings. These certificates will be automatically installed to appropriate stores and the .CER, .PFX files will be deleted accordingly after installation.
Pre-configured package contains sensitive data. Please be careful especially with .PFX file that contains the private key of your WinRM bridge service. For the same reason, don’t distribute or share this pre-configured package to any unnecessary locations or media.
- Server certificate with private key (.PFX file) is installed to Machine/Personal store.
- Issuer certificate (.CER file) is installed to Machine/Root store.
To install WinRM bridge service manually, start a command prompt (cmd.exe) as an Administrator, go to the extracted WinRM Bridge folder and run this command:
|
1 |
wmbridge install |
To uninstall WinRM bridge service manually, run this command as an Administrator:
|
1 |
wmbridge uninstall |
Additionally, configuration utility allows you to export issuer and server certificate with private key.
Manual installation as a Windows Service
These steps are necessary only when you install WinRM bridge service manually from binaries using command line and without using pre-configured package created by configuration utility.
Create a file next to the WmBridge.exe with name “WmBridge.Host.config” using notepad or another text editor you like with this XML structure:
|
1 2 3 4 5 6 7 8 9 10 11 |
<wmbridge> <listeners> <add url="https://*:4444/" /> </listeners> <autodiscovery> <add url="https://192.168.2.2:4444" /> </autodiscovery> <installation> <add key="firewallException" value="True" /> </installation> </wmbridge> |
- Listener element can contain multiple URL prefixes to listen on. Asterisk (*) means binding to all network interfaces, plus (+) binding only to localhost.
- Autodiscovery element can also contain multiple URL. This will be promoted to clients on the local network.
- By setting “firewallException” to “True” you give instructions to installation process to create a firewall exceptions for autodiscovery module and listeners ports.
If you are using HTTPS listener, you must also have installed server certificate with a private key. Certificate’s common name (CN) should have the same name as a host/IP in the URL you put on mobile device to the bridge service URL field, otherwise the connection will be considered as untrusted by the client.
So let’s install a server certificate. Open Microsoft Management Console (mmc.exe), click File -> Add or Remove Snap-ins, select Certificates -> Add -> Computer account.
Now navigate to Personal certificate store, then select Import from context menu. You must also have a private key, so you should import some .PFX file. If you use self-signed certificate, don’t forget to import your self-signed issuer to Trusted Root Certification Authorities store. Otherwise SSL binding won’t work because imported server certificate is not trusted.
Setting service log on account
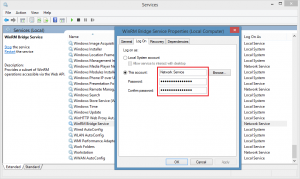
 By default, WinRM Bridge service is running under NETWORK SERVICE account. If your computer is not connected to a Windows domain (you are using workgroup), it’s recommended to run bridge service under some local user account. Otherwise remote activation won’t work. Check FAQ page for details.
To change bridge service account, open services.msc, find “WinRM Bridge Service”, go to the properties tab “Log On” and here, provide some local account’s credentials.
Add URL reservation for the same account as the WinRM Bridge Service is running under (in this case NETWORK SERVICE).
This step is also necessary if you are changing Log On account for installed WinRM Bridge Service by setup wizard.
|
1 |
netsh http add urlacl url=https://*:4444/ user="NT AUTHORITY\NETWORK SERVICE" |
When error message “Cannot create a file when that file already exists” is displayed, delete old reservation by this command:
|
1 |
netsh http delete urlacl url=https://*:4444/ |
Installation as a Web Application inside IIS
You can install WinRM Bridge inside IIS server which gives you more configuration possibilities like host multiple web applications on single web site when you are limited to one public IP address.
The following video is just an example of basic HTTP hosting assuming that you are familiar with IIS administration.
In production environment you should definitely set up HTTPS binding with appropriate certificate.
If everything goes well, you will see the app logo when you browse at the bridge service’s URL.
To AppPool identity are applicable the same rules as to bridge service logon account. So if your computer is not connected to a Windows domain, you should set AppPool identity to some local user account, otherwise remote activation won’t work.
There are some limitations hosting bridge service inside IIS. It is not possible to have autodiscovery feature because of the way how IIS working processes behave.
However, you can install standard WinRM bridge as a Windows service on the same server manually (read above) without configuring any listener bindings, only adding autodiscovery URL.
With this combination you have all IIS benefits like web applications or AppPool recycling, and you also have autodiscovery feature like standard bridge service does.

